In our previous Node.js installation tutorial you have learned how to install Node.js on Ubuntu. In this tutorial, you will learn how to install Node.js on Windows to run your first Node.js application.
Node.js is an open source framework that allows us to run JavaScript on the server. The Node.js is very memory efficient as it runs as single-threaded, non-blocking and asynchronously. It supports all major platform like Windows, Linux, Unix, Mac etc. Due to Node.js awesome features, it becomes popular among web developers to develop dynamic web projects.
So if you’re using Windows operating systems and wants to start with Node.js, you’re here at right place.


Also, read:
So in this tutorial we will give you detailed guide to get started with Node.js on Windows. The tutorial will include following:
- Download Node.js Windows Installer
- Install Node.js on Windows
- Run Your First Node.js “Hello” Program
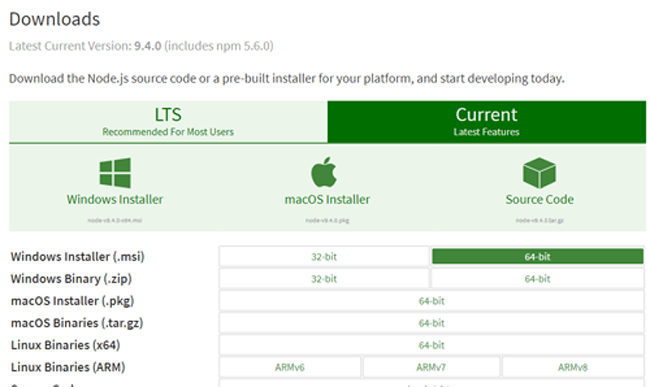
Step1: Download Node.js Windows Installer
- First we will download Node.js Windows Installer from Node.js official website https://nodejs.org/en/download/ download page. In this tutorial we are going to the download the 64-bit Node.js Windows Installer (.msi).

Step2: Install Node.js on Windows
- After Node.js Windows Installer (.msi) download, double click on the downloaded .msi file to start the installation. Click the Run button in the first screen to begin the installation if it is displayed. Then click the Next button to continue with the installation.
- In the next screen, check the Accept License Agreement and click on the Next button.
- In the next screen, choose the destination location where Node.js needs to be installed and then click on the Next button.
- In the custom setup screne, choose the default Node.js runtime and click on the Next button.
- In the next screen, click the Install button to start the installation. It will take some time to complete installation process.
- After installation process complete, complete installation screen displayed. Click the Finish button to complete the installation.
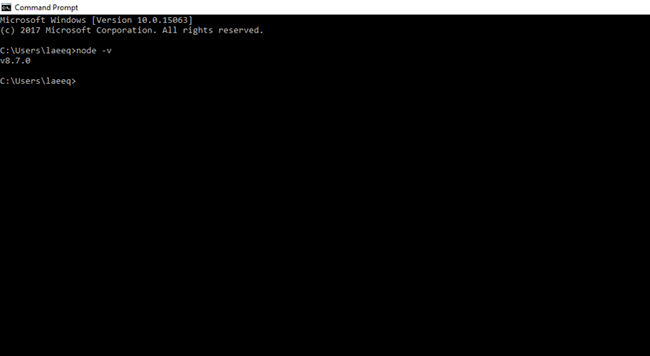
- Congratulations, you have successfully installed Node.js on your Windows computer. Now we will check whether the Node.js installed correctly. So we will open Command Prompt and then type node -v to check installed Node.js version. If Node.js installed successfully, then it will display installed Node.js version.

Step3: Run Your First Node.js “Hello” Program
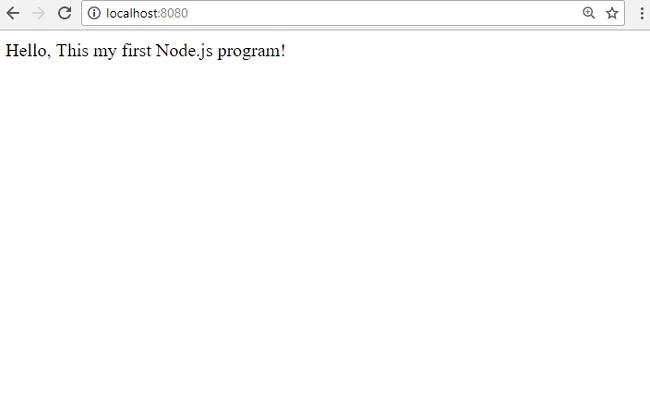
- As now Node.js installed on your Windows computer, so we will run first Node.js “Hello” program by creating Hello.js file. We will not explain code here and cover this in latter tutorials.
var http = require('http'); http.createServer(function (req, res) { res.writeHead(200, {'Content-Type': 'text/html'}); res.end('Hello, This my first Node.js program!'); }).listen(8080); - Now we will run our first Node.js program using node. We will open up command prompt again and go to the directory in which placed Hello.js file. Then we will type node Hello.js and hit Enter key. Now your Node.js server restart and your newly created webserver is listening on port 8080. if you tries to access port 8080 like http://localhost:8080/ in browser, you will get a “Hello, This my first Node.js program!” message on web page.
- You always need to restart your node program whenever you made change in the source code of your Node.js program.
- Now start any browser in your computer, and type in the address: http://localhost:8080, you will get following message:

Congratulations, again! You have just run your very own webserver in node!
You may also like:
- How to Install Node.js on Ubuntu
- Amazon S3 File Upload using Node.js
- Upload Multiple Image File with Node.js
- Scrape Search Data with SERP API using Node.js
- Create REST API with Node.js, Express & MongoDB
- User Login and Registration with Node.js, Express & MySQL
- User Authentication and Authorization with Node.js
- Chat Application with Node.js, Express & MongoDB