In this tutorial, we will explain about Node.js from scratch. The tutorial is designed for beginners and professionals who want to learn the basics of Node.js and it’s concepts to develop web applications. This tutorial will give you deep understanding about Node.js to start development with this.
Prerequisites
As you’re going to learn Node.js to develop web applications, So it will be good if you have a basic understanding of JavaScript and web technologies like HTML, CSS etc.
What is Node.js?
Node.js is an open-source JavaScript runtime environment built on Chrome’s V8 JavaScript engine. Node.js was developed by Ryan Dahl in 2009. You can check the latest version here on Node.js official website https://nodejs.org/.
It’s always been confusion among beginners exactly what it is. The main impportant thing to reliaze about Node js that it is not a webserver. It doesn’t work like a web servers. In fact, it’s JavaScript runtine or can say another way to execute JavaScript code on the server. So if you want to be a HTTP server, you have to write an HTTP server with Node libraries.
The Node.js also provides an event driven, non-blocking I/O and cross-platform runtime environment for building highly scalable server-side application using JavaScript.
Install Node.js
To start programming with Node.js, you need to setup development environment to start developing node.js applications.
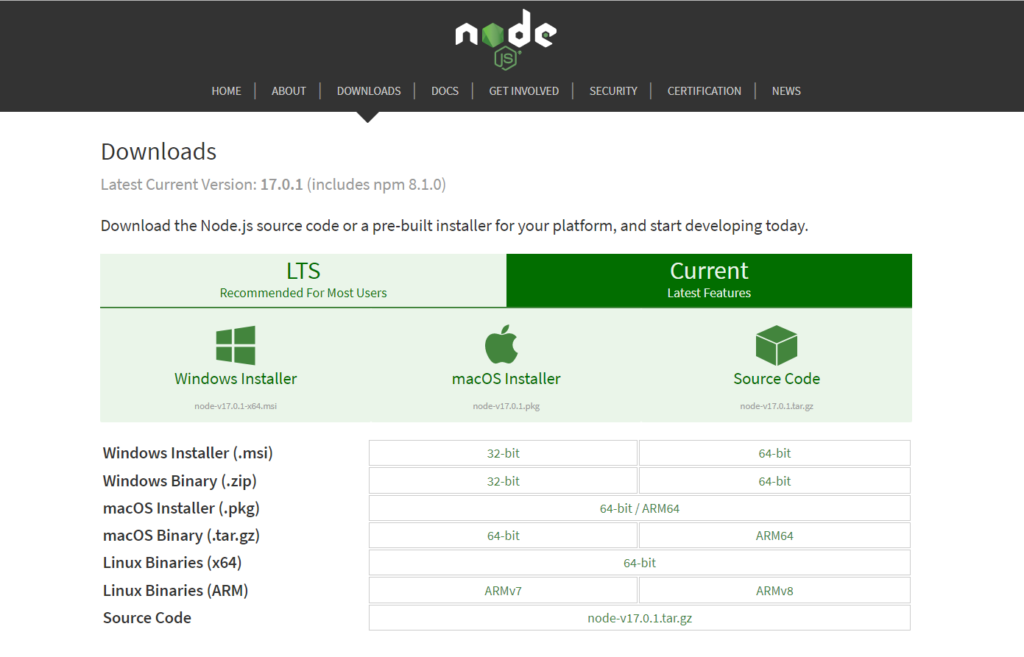
The Node.js development environment can be set in Windows, Linux, Mac and Solaris platform. You can visit te Node.js official website https://nodejs.org/ and download the Node.js SDK as per your operating system to complete installation. It will display current installer like below for different platform. You can download the installer and complete installation.
You can checkout our tutorial to install Node.js on Windows and install Node.js on Lunux platform.
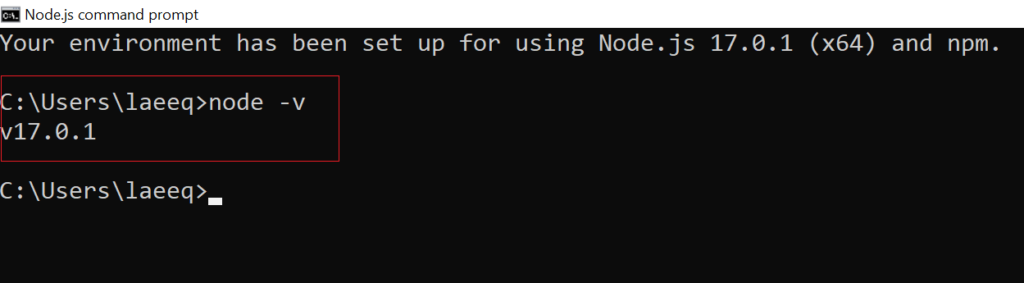
Once you finished Node.js installation on your computer, you can check it by opening the command prompt and typing node -v. If Node.js is installed successfully then it will display the version of the Node.js installed on your computer, as shown below.
There are following tools/SDK are required to setup on any platform to start developing Node.js application.
- Node.js
- Node Package Manager (NPM)
- IDE or TextEditor : You will need to install editor like Atom, Visaul Studio code, Notepad++, Vim etc. to write code.
Since Node.js version 0.6.0, the NPM (Node Package Manager) is already included in Node.js installation, so there are no need to install it separately.
Node.js – REPL Terminal
REPL (Read Eval Print Loop) represents a computer environment like a Windows console or Unix/Linux shell where a command is entered and the system responds with an output in an interactive mode. It is a quick and easy way to test simple Node.js or JavaScript code.
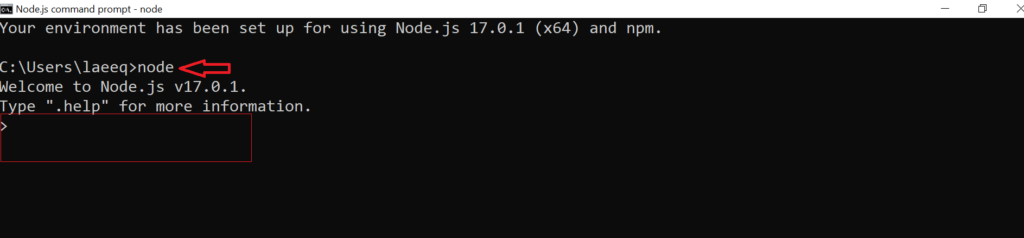
To launch the REPL terminal, open command prompt (in Windows) or terminal (in Mac or UNIX/Linux) and type node as shown below. It will change the prompt to > in Windows and MAC.
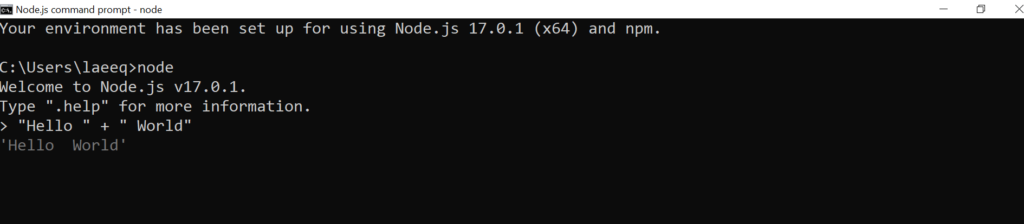
Now you can expressions or code test it. Here 20 + 30 will display immediately in new line.

You can also check + operator for concatenates strings same as in browser’s JavaScript.
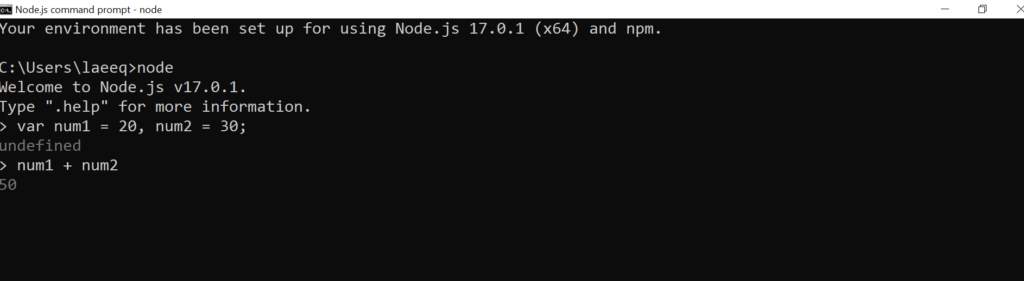
You can also define variables and perform operation on them.
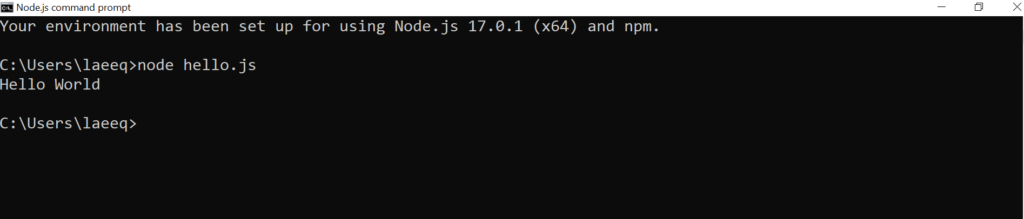
You can also execute an external JavaScript file by executing the node fileName command.
Node.js – NPM
NPM (Node Package Manager) is a command line tool used for installing, uninstalling and updating Node.js packages for your applications. It’s also an online repository for oepn-source node packages. The NPM comes bundled with Node.js instalation after v0.6.3 version, so there are no need to install this separately.
You can verify the NPM installation after installing Node.js with following command:
C:\> npm -v
8.1.0
You can update old version of NPM with latest version with following command:
C:\> npm install npm -g
As the major task of NPM commands is to install Node.js packages. There are two ways to install the packages: Locally or Globally. If package installed as locally then it perform operation local to that application directory. If package installed globally then NPM will perform operation with all applications.
All the packages or module installed using NPM are installed under node_modules directory in the root direcotry of your project.
Here is the command to install Node.js package with NPM command.
C:\>npm install <package name>
Install Package Locally
When you install package locally then it will be installed local to that application. For example, here installing express package locally to myapp directory.
C:\myapp> npm install express
You can also use --save with install command to add dependency into package.json of your application.
C:\myapp> npm install express --save
The package.json of myapp project will be like below.
{
  "name": "myapp",
  "version": "0.0.0",
  "description": "myapp application",
  "main": "app.js",
  "author": {
    "name": "Dev",
    "email": ""
  },
  "dependencies": {
    "express": "^4.17.1"
  }
}
Install Package Globally
You can apply -g with install command to install package globally. The following command will install the package express as globally for all applications.
C:\> npm install -g express
Update Package
You can update the installed package with following command.
C:\myapp> npm update <package name>
The following command will update the express module.
C:\myapp> npm update express
Uninstall Packages
you can unstall modules from application using following command.
C:\myapp> npm uninstall <package name>
You can uninstall the express module with following command.
C:\myapp> npm update express
Node.js – First Application
After installing Node.js and overview about NPM, now we will see the components of a node.js application. So here we will create a first node.js application to create a web server.
A Node.js application consists of following components:
- Import required modules − Need to use the require directive to load Node.js modules.
- Create server − A server created which will listen to client’s requests similar to Apache HTTP Server.
- Read request and return response − The server will read the HTTP request made by the client which can be a browser or a console and return the response.
Import Modules
We need to import Node.js code or NPM modules to to use in application. The modules imported with require directive like below.
var module = require('module_name');
Here we will import http module and store the returned HTTP instance into an http variable to create a web server.
const http = require('http');
We will use the created http instance and call http.createServer() method to create a server instance and then we bind it at port 3000 using the listen method associated with the server instance.
var server = http.createServer(function(req, res) => {

  //write code here

});

server.listen(3000);
The above code will create an HTTP server which listens over 3000 port on the local machine.
Now we will put togather all code in app.js and check our HTTP web server.
const http = require('http');

const hostName = '127.0.0.1';
const port = 3000;

const server = http.createServer((req, res) => {
  // Send the HTTP header
  // HTTP Status: 200 : OK
  res.statusCode = 200;
  // Content Type: text/plain
  res.setHeader('Content-Type', 'text/plain');
  // Send the response body as "Hello World!"
  res.end('Hello World!');
});

server.listen(port, hostName, () => {
  console.log('Server running at http://${hostName}:${port}/');
});
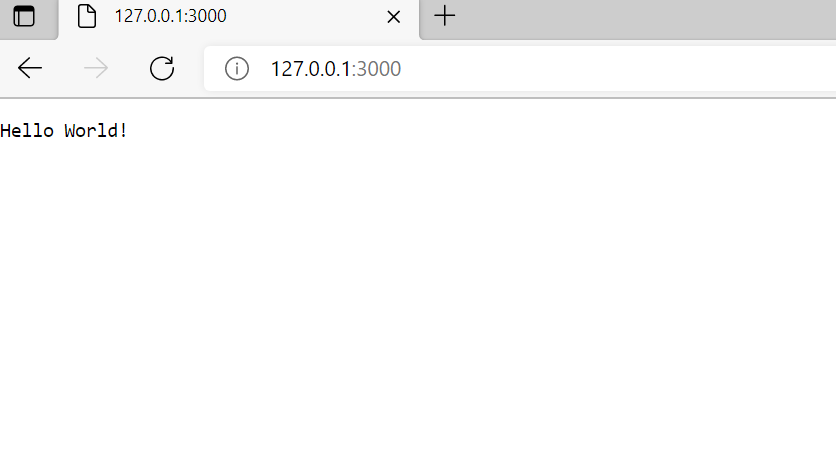
Now we will execute the app.js to start the server :
C:\myapp>node app.js
The console will display the following message:
Server running at http://127.0.0.1:3000/
Now we will Open http://127.0.0.1:8081/ in a browser and see the following output.