Chat Application are developed and used for conversation. It is a special feature and used in many websites to allow user to conversation. The conversations are run one to one or group conversation among multiple users. Generally, web chat applications are developed with server side languages and it’s always challenge to get the real time chat data.
So if you’re thinking about developing your own chat application with real time data, then it’s a very easy with Node.js. In our previous tutorial you have learned about User Authentication and Authorization with Node.js. In this tutorial you will learn how to implement Real-time Chat application with Node.js, Express and MongoDB. We will use the JavaScript framework Express.js and Node.js modules Mangoose and Socket.io to implement the full functional chat system.
Also, read:
We will cover following in this tutorial:
- The user send message with their name and message text.
- The message displayed to recipient without page refresh with
Socket.io. - Users conversation displayed with all messages.
So let’s proceed with coding. We will create project directory chat_nodejs and have following file structure.
- package.json
- server.js
- index.html
Step1: Create Chat Application
First we will create our chat application directory chat_nodejs.
we will go to the root directory of our application and type npm init to initialize our chat application.
$ cd chat_nodejs
$ npm init
A package.json file will be created at the root directory of our project.
{
  "name": "chat_nodejs",
  "version": "1.0.0",
  "description": "",
  "main": "index.js",
  "scripts": {
    "test": "echo \"Error: no test specified\" && exit 1"
  },
  "author": "coderszine",
  "license": "ISC"
}
Step2: Create Server
We will need to create server. So we will install web application framework Express for this. We will install the framework using following command:
$ npm install -s express
After installation, below lines will be added to the package.json file:
"dependencies": {
"express": "^4.17.1"
}
Now we will create server.js at the root of our application. We will require Express and create reference from an instance of Express. The contents like HTML, CSS or JavaScript served through Express.
var express = require(‘express’);
var app = express();
and also our server will start listening to a port using the following code:
var server = app.listen(3000, () => {
 console.log('server is running on port', server.address().port);
});
Step3: Create Chat Page and Load
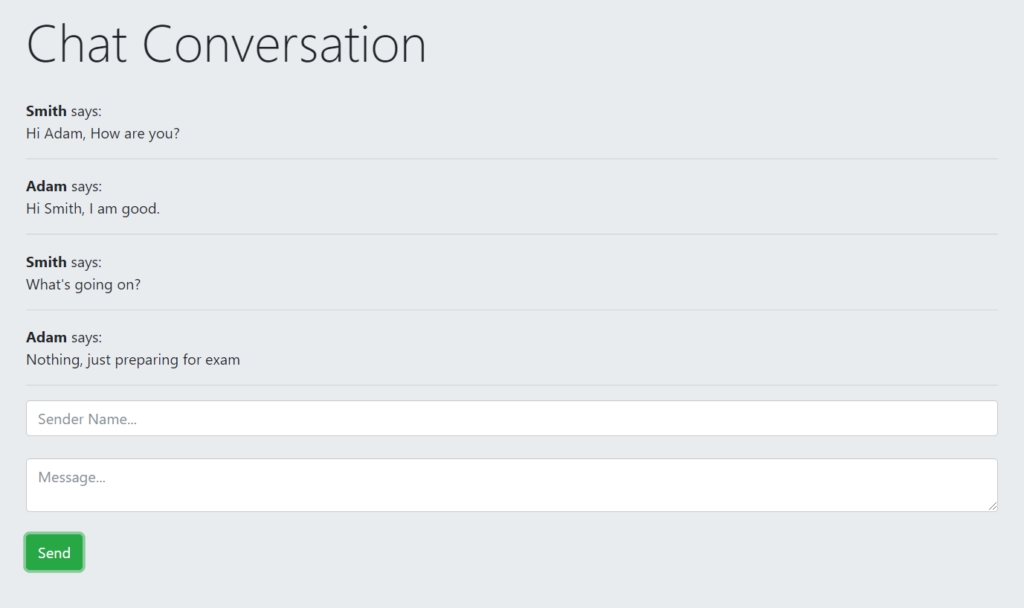
We need a chat page to send messages and display conversation. So we will create index.html file and design chat page design with Bootstrap.
<!DOCTYPE html>
<html>
<head>
<title>coderszine.com - chat application with Node.js</title>
<link rel="stylesheet" href="https://maxcdn.bootstrapcdn.com/bootstrap/4.0.0-beta/css/bootstrap.min.css">
<script src="https://code.jquery.com/jquery-3.2.1.min.js"></script>
<script src="https://cdnjs.cloudflare.com/ajax/libs/popper.js/1.11.0/umd/popper.min.js"></script>
<script src="https://maxcdn.bootstrapcdn.com/bootstrap/4.0.0-beta/js/bootstrap.min.js"></script>
</head>
<body>
<div class="container">
    <br>
    <div class="jumbotron">
        <h1 class="display-4">Chat Conversation</h1>
        <br>
		<div id="messages">
		</div>
        <input id="name" class="form-control" placeholder="Sender Name...">
        <br>
        <textarea id="message" class="form-control" placeholder="Message..."></textarea>
        <br>
        <button id="send" class="btn btn-success">Send</button>
    </div>
</div>
</body>
</html>
We need to tell Expres that we will use static HTML file. So we will add following code to server.js
app.use(express.static(__dirname));
Now if we run the server, the chat page will be displayed.
Step4: Configure Database and Connection
We will store the chat messages into MongoDB database chat and table messages. So we will install Mongoose, a MongoDB object modeling tool designed to work in an asynchronous environment to make connection. We will install the Mongoose using following command:
$ npm install -s mongoose
We require Mongoose insdie server.js
var mongoose = require(‘mongoose’);
We will have MongoDB database URL and connect to the database.
var databaseUrl = 'mongodb://localhost:27017/chat'

mongoose.connect(databaseUrl, {
    useNewUrlParser: true,
	useUnifiedTopology: true
}).then(() => {
    console.log("Successfully connected to the database");
}).catch(err => {
    console.log('Could not connect to the database. Exiting now...', err);
    process.exit();
});
Then we will define the message model as following:
var Message = mongoose.model('Message',{ name : String, message : String})
Step5: Install and Use Body-Parser
We will also need to install the Body-Parser module which extracts the entire body portion of an incoming request stream and exposes it on req.body. We will use the following command to install this module.
$ npm install -s body-parser
Then we will add following code to the server.js:
var bodyParser = require('body-parser')
app.use(bodyParser.json());
app.use(bodyParser.urlencoded({extended: false}))
Step6: Configure Routing
Routing is refers to the applications endpoint which are requested and return response. We will define the routing using Express methods that correspond to HTTP methods app.get() to handle the GET request and app.post() to handle the post requests.
We will create following routes with GET method to get all the message from database.
app.get('/messages', (req, res) => {
  Message.find({},(err, messages)=> {
    res.send(messages);
  })
})
We will also create following routes with POST method to post new messages to save into database.
app.post('/messages', (req, res) => {
  var message = new Message(req.body);
  message.save((err) =>{
    if(err)
      sendStatus(500);
    res.sendStatus(200);
  })
})
Step7: Call Routes from Client-end
Now we will call the post and get routes from client-end to send message and display messages. We will add following jQuery code before body within script tag in index.html file.
function addMessages(message){
	$("#messages").append('<div><strong>'+message.name.charAt(0).toUpperCase()+message.name.slice(1)+'</strong> says: <br><span>'+message.message+'</span></div><hr/>');
}

function getMessages(){
  $.get('http://localhost:3000/messages', (data) => {
	data.forEach(addMessages);
  })
}

function sendMessage(message){
  $.post('http://localhost:3000/messages', message)
  $("#name").val("");
  $("#message").val("");
}
Step8: Handle Real-time Chat with Socket.io
Socket.IO is a JavaScript library to use for real-time bi-directional communication between web clients and server. The library has a client-side library that runs in the browser, and a server-side library for Node.js. So we will use following command to install the Socket.IO
$ npm install -s socket.io
As we also need an HTTP package for to work, so we will install the HTTP package using below command:
$ npm install -s http
Then we will add the following code to server.js
var http = require('http').Server(app);
var io = require('socket.io')(http);
and also we will create connection by adding following code to server.js:
io.on('connection', () =>{
 console.log('a user is connected')
})
Then we will add the following code to the index.html within HEAD tag.
<script src=”/socket.io/socket.io.js”></script>
We will need to add the emit action in server.js when a message is created to save to the database. We will add following code for this.
app.post('/messages', async (req, res) => {
  try{
    var message = new Message(req.body);
    await message.save()
    var censored = await Message.findOne({message:'badword'});
      if(censored)
        await Message.remove({_id: censored.id})
      else
        io.emit('message', req.body);
      res.sendStatus(200);
  }
  catch (error){
    res.sendStatus(500);
    return console.log('error',error);
  }
  finally{
    console.log('Message send')
  }
})
Finally, we will add the following code to the script tag in index.html to handle message send and display. When a message is send, the server will update the message to display it.
var socket = io();

socket.on('message', addMessages)
Step9: Run Chat Application
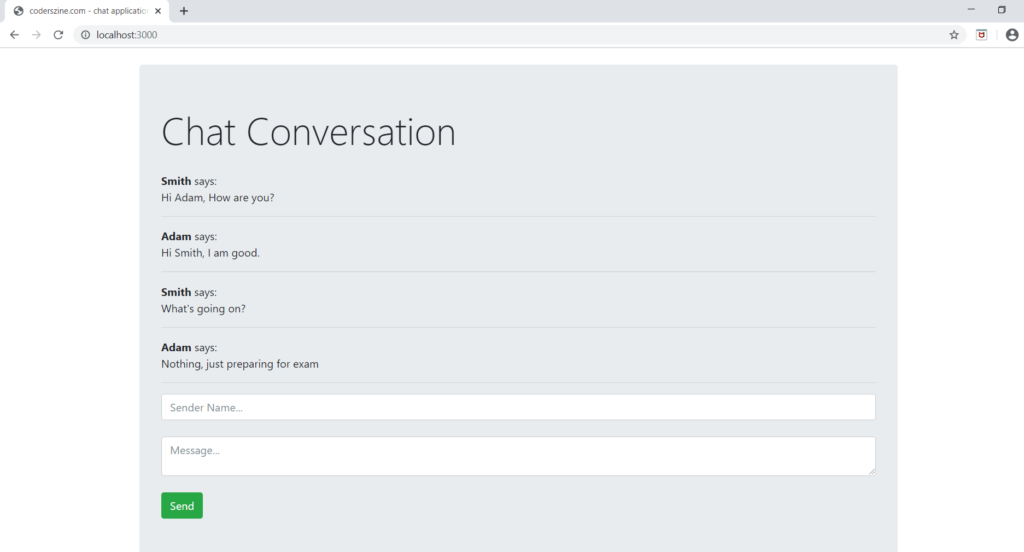
Now finally we will run our chat application by below command.
$ node server.js
Then we will open the http://localhost:3000/ into browser to run the chat application.
You may also like:
- How to Install Node.js on Windows
- How to Install Node.js on Ubuntu
- Amazon S3 File Upload using Node.js
- Upload Multiple Image File with Node.js
- Scrape Search Data with SERP API using Node.js
- Create REST API with Node.js, Express & MongoDB
- User Login and Registration with Node.js, Express & MySQL
- User Authentication and Authorization with Node.js
- Chat Application with Node.js, Express & MongoDB
You can download the complete demo script from the Download link below.
Download
How can I see the chat data in MongoDB Server
you can access the database collection through terminal/command. thanks