In our previous tutorial, we have explained how to create REST API with PHP & MySQL. In this tutorial, we will explain how to create REST API with Node.js, Express and MongoDB.
REST stands for “Representational State Transfer” which determines how API will behave. It is a set of rules that developers follow while creating API. The rules are related to the operations with data to create, read, update and delete etc.
In this tutorial you will learn how to create RESTful API with Node.js, Express and MongoDB.
Express is a Node.js framework that adds support for routing, middleware, view system etc. We will also use Mongoose, an ODM (Object Document Mapping) tool to interact with the MongoDB instances.

Also, read:
Please make sure to install MangoDB before proceeding with this tutorial. You can checkout the MangoDB installation Manual to install on your system.
We will create complete RESTful API to perform CRUD operations (create, read, update, delete) on product data with methods (GET, POST, PUT, DELETE). We will test CRUD operations with POSTMAN APP at the end of tutorial.
So let’s proceed to create simple REST API with Node JS, Express and MongoDB. The major files are:
- server.js:
- datatabse.config.js:
- product.model.js:
- product.routes.js: .
- product.controllers.js: .
Step1: Create Application
First we will create our REST API application directory rest_node_api.
$ mkdir rest_node_api
we will go to the root directory of our application and type npm init to initialize our application with a package.json file.
$ cd rest_node_api
$ npm init
The package.json file will be created at the root of application directory.
{
  "name": "rest_node_api",
  "version": "1.0.0",
  "description": "",
  "main": "server.js",
  "scripts": {
    "test": "echo \"Error: no test specified\" && exit 1"
  },
  "keywords": [],
  "author": "",
  "license": "ISC"
}
We will change main file from index.js file to server.js that we will create later as it will be entry point of our application.
Step2: Install Application Dependencies
We will need to install the dependency modules for the our application. So we will install express, mongoose and body-parser modules in our application.
$ npm install express body-parser mongoose --save
Now all the dependencies will be added in the package.json file. The final package.json file will be following.
{
  "name": "rest_node_api",
  "version": "1.0.0",
  "description": "",
  "main": "server.js",
  "scripts": {
    "test": "echo \"Error: no test specified\" && exit 1"
  },
  "keywords": [],
  "author": "",
  "license": "ISC",
  "dependencies": {
    "body-parser": "^1.19.0",
    "express": "^4.17.1",
    "mongoose": "^5.8.10"
  }
}
There will also be node_modules folder added at the root of our application with Node modules.
Step3: Setup Application Server.js File
Now we will create our application main entry point file. We will create server.js file at the root of our application. We will add following code to our server.js file.
const express = require('express');
const bodyParser = require('body-parser');

const app = express();

app.use(bodyParser.urlencoded({ extended: true }))

app.use(bodyParser.json())

app.get('/', (req, res) => {
    res.json({"message": "Welcome to our REST API CRUD application."});
});

app.listen(3000, () => {
    console.log("Server is listening on port 3000");
});
At the top of file, we will import the express and body-parser modules. The body-parser is a module that parses the requests and creates a req.body object to access in routes.
We will create an express app and add body-parser middlewares using express’s app.use() method. A middleware is a function that has access to the request and response objects. It can execute any code, transform the request object, or return a response.
Then, We will define a GET route that returns a welcome message to the clients.
Finally, We will listen on port 3000 for incoming connections. Now we will run the server using following command:
$ node server.js
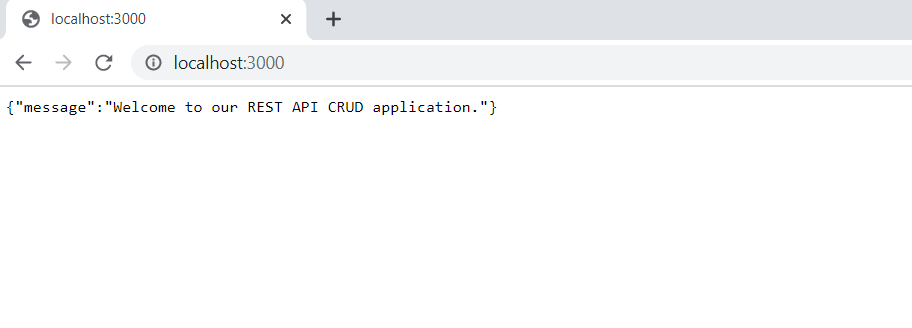
The server will be started and display following message.
![]()
We will access application on through http://localhost:3000/ URL on your system.
Step4: Database Connection Configuration
Now we will configure database connection with MongoDB. We will create a directory config at the root of our application.
$ mkdir config
$ cd config
we will reate a new file database.config.js inside config directory. We will add following to database.config.js file.
module.exports = {
    url: 'mongodb://localhost:27017/products'
}
Now we will import the database configuration into server.js file. We will connect to the database with mongoose. So we will add the following code to the server.js just after app.use(bodyParser.json()) code line.
const dbConfig = require('./config/database.config.js');
const mongoose = require('mongoose');

mongoose.Promise = global.Promise;

mongoose.connect(dbConfig.url, {
    useNewUrlParser: true
}).then(() => {
    console.log("Successfully connected to the database");
}).catch(err => {
    console.log('Could not connect to the database. Exiting now...', err);
    process.exit();
});
Then, we will run the application server and it will show database connection message.

Step5: Create Application Model
We will define model of our application. We will create a directory app at the root of our application. Then we will create directory models inside the app directory.
$ mkdir -p app/models
$ cd app/models
Now we will create a file product.model.js inside app/models directory. We will create model with mongoose. We will add following code to the product.model.js file.
const mongoose = require('mongoose');

const ProductSchema = mongoose.Schema({
    name: String,
    description: String
}, {
    timestamps: true
});

module.exports = mongoose.model('Product', ProductSchema);
Above we have create product model with product name, description and timestams to create product schema. The timestams options used automatically by Mangoose to add two new fields createdAt and updatedAt to the schema.
Step6: Create Application Routing
We will create routing for our REST API application. We will create a directory routes inside the app direcotry.
$ mkdir app/routes
$ cd app/routes
Now, we will create a new file called product.routes.js inside app/routes directory with the following code.
module.exports = (app) => {
    const product = require('../controllers/product.controller.js');

    // Create a new product
    app.post('/product', product.create);

    // Retrieve all product
    app.get('/product', product.findAll);

    // Retrieve a single product with productId
    app.get('/product/:productId', product.findOne);

    // Update a product with productId
    app.put('/product/:productId', product.update);

    // Delete a product with productId
    app.delete('/product/:productId', product.delete);
}
In above routing code, we have called controllers/product.controller.js. We will define the controller file in the next step. The controller will have methods to handle CRUD operations on product.
We will also need to include the routes in server.js. We will add the following code to the server.js file before app.listen() line.
require('./app/routes/product.routes.js')(app);
Step7: Create Application Controllers
Now we will create the controllers for our application. We will create a directory controllers inside the app directory. We will create a new file product.controller.js inside app/controllers directory.
We will add following code into the product.controller.js file. We will include product.model.js model and implement create, find, update and update methods to perform operations on product.
const Product = require('../models/product.model.js');

exports.create = (req, res) => {

    if(!req.body.description) {
        return res.status(400).send({
            message: "Product description can not be empty"
        });
    }

    const product = new Product({
        name: req.body.name || "Untitled Product Name",
        description: req.body.description
    });

    product.save()
    .then(data => {
        res.send(data);
    }).catch(err => {
        res.status(500).send({
            message: err.message || "Some error occurred while creating the Product."
        });
    });
};

exports.findAll = (req, res) => {
    Product.find()
    .then(products => {
        res.send(products);
    }).catch(err => {
        res.status(500).send({
            message: err.message || "Some error occurred while retrieving product."
        });
    });
};

exports.findOne = (req, res) => {
    Product.findById(req.params.productId)
    .then(product => {
        if(!product) {
            return res.status(404).send({
                message: "Product not found with id " + req.params.productId
            });
        }
        res.send(product);
    }).catch(err => {
        if(err.kind === 'ObjectId') {
            return res.status(404).send({
                message: "Product not found with id " + req.params.productId
            });
        }
        return res.status(500).send({
            message: "Error retrieving product with id " + req.params.productId
        });
    });
};

exports.update = (req, res) => {

    if(!req.body.name) {
        return res.status(400).send({
            message: "product name can not be empty"
        });
    }

    Product.findByIdAndUpdate(req.params.productId, {
        name: req.body.name || "Untitled Product Name",
        description: req.body.description
    }, {new: true})
    .then(product => {
        if(!product) {
            return res.status(404).send({
                message: "Product not found with id " + req.params.productId
            });
        }
        res.send(product);
    }).catch(err => {
        if(err.kind === 'ObjectId') {
            return res.status(404).send({
                message: "Product not found with id " + req.params.productId
            });
        }
        return res.status(500).send({
            message: "Error updating Product with id " + req.params.productId
        });
    });
};


exports.delete = (req, res) => {
    Product.findByIdAndRemove(req.params.productId)
    .then(product => {
        if(!product) {
            return res.status(404).send({
                message: "Product not found with id " + req.params.productId
            });
        }
        res.send({message: "Product deleted successfully!"});
    }).catch(err => {
        if(err.kind === 'ObjectId' || err.name === 'NotFound') {
            return res.status(404).send({
                message: "Product not found with id " + req.params.productId
            });
        }
        return res.status(500).send({
            message: "Could not delete Product with id " + req.params.productId
        });
    });
};
Step8: Testing Application with POSTMAN APP
Now we will test our REST API application with Postman application.
Create new product with POST method

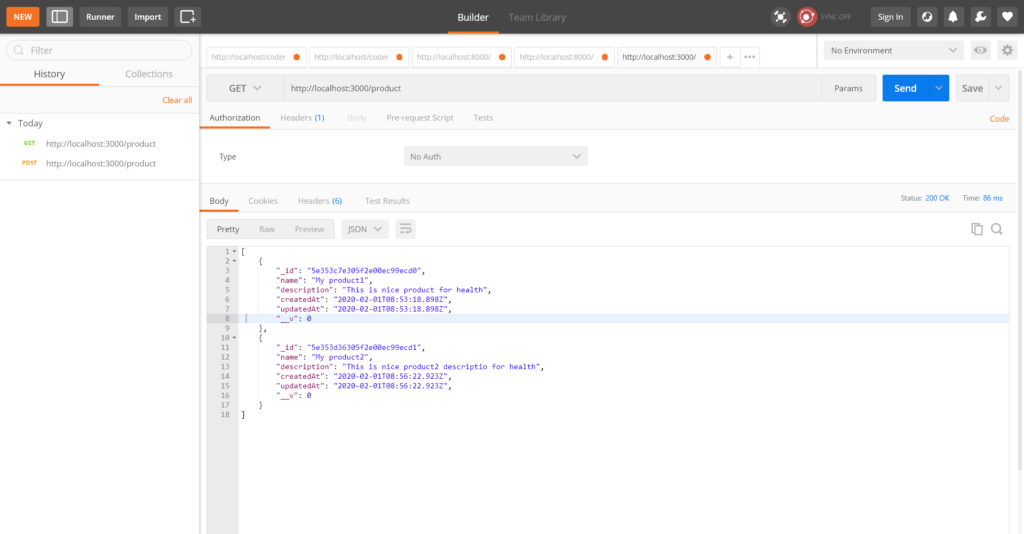
Retrieve all product with GET method
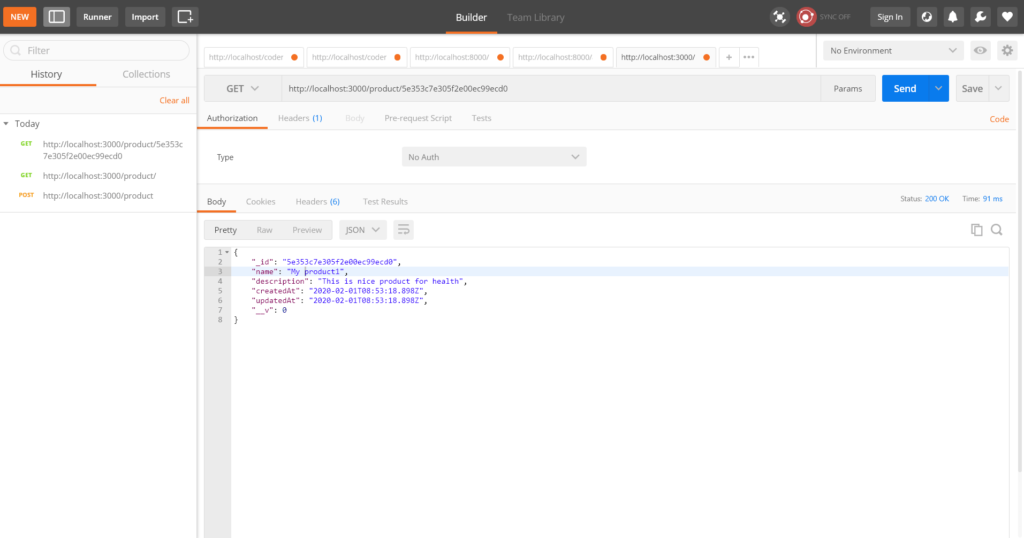
Retrieve product by id with GET method
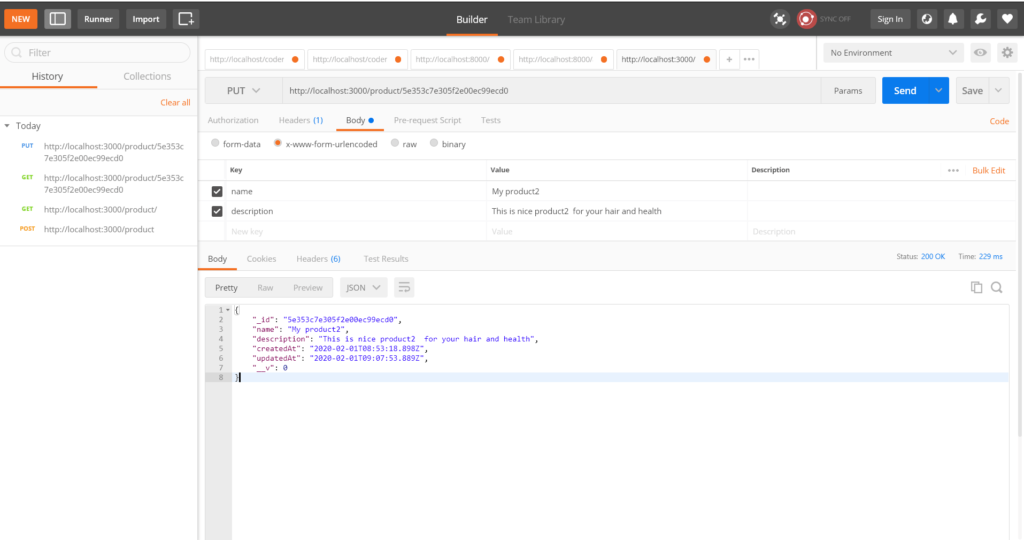
Update product with PUT method
Delete product with DELETE method

Conclusion
In this tutorial, you have learned step by step to create simple RESTful API with Node.js, express and MangoDB. You can try these to your system create own REST API. You can give your precious comments if you have any query or suggestions in the comment section below. You can also download the complete application code from download link below.
You may also like:
- How to Install Node.js on Windows
- How to Install Node.js on Ubuntu
- Amazon S3 File Upload using Node.js
- Upload Multiple Image File with Node.js
- Scrape Search Data with SERP API using Node.js
- User Login and Registration with Node.js, Express & MySQL
- User Authentication and Authorization with Node.js
- Chat Application with Node.js, Express & MongoDB
You can download the script from the Download link below.
Download