In our previous tutorial, we have explained how to implement TinyMCE Upload Image with Ajax and PHP. In this tutorial, you will learn how to Load Dynamic TinyMCE Editor with Ajax, PHP & MySQL.
TinyMCE is a popular WYSIWYG Editor to use for getting input to save to the database. It is used in web applications to add and edit HTML contents. The new contents added with fixed editor but there TinyMCE editor needs to be loaded and removed dynamically to edit the content from different records.
So if you’re looking for solutions to load and remove TinyMCE editor dynamically to save contents, then you’re here at the right place. In this tutorial you will learn how to dynamically load and remove TinyMCE editor to edit save contents from different records with Ajax, PHP and MySQL.
Also, read:
We will cover this tutorial step by step to load and remove TinyMCE editor dynamically and save content to the MySQL database table.
So let’s implement load and remove TinyMCE editor dynamically and save content to the MySQL database table with Ajax, PHP and MySQL. The major files are:
- index.php: PHP file to load TinyMCE editor and records with message.
- tinymce_editor.js: A JavaScript file to initialize TinyMCE editor and functionality for edit save.
- action.php: A PHP file to handle ajax request action to edit save records.
- Message.php: A class which holds methods to get, save and edit records.
Database Table
As in this tutorial, we will display records from database and edit/save that records by loading dynamic TinyMCE editor. So first we will create MySQL database table message using below table create statement to handle functionality.
CREATE TABLE `message` (
  `id` int(11) NOT NULL,
  `message` text NOT NULL,
  `user` varchar(255) NOT NULL,
  `created` datetime NOT NULL DEFAULT CURRENT_TIMESTAMP
) ENGINE=InnoDB DEFAULT CHARSET=utf8mb4;

ALTER TABLE `message`
  ADD PRIMARY KEY (`id`);

ALTER TABLE `message`
  MODIFY `id` int(11) NOT NULL AUTO_INCREMENT;
Step1: Include TinyMCE Editor and jQuery
We will download the TinyMCE editor library and stored into folder tinymce and included into index.php file. We will also include jQuery and custom JavaScript tinymce_editor.js file.
<script src="https://ajax.googleapis.com/ajax/libs/jquery/2.1.3/jquery.min.js"></script>
<script src="tinymce/tinymce.min.js"></script>
<script src="js/tinymce_editor.js"></script>
Step2: Load TinyMCE editor To Save New Message
We will create Form with textarea to load TinyMCE editor to add new message.
<form id="posts" name="posts" method="post">
	<textarea name="message" id="message"></textarea><br>
	<input type="hidden" name="action" id="action" value="save" />
	<button type="submit" id="save" name="save" class="btn btn-info saveButton">Save</button>
</form>
Step3: Load TinyMCE Editor
In tinymce_editor.js file, we will create function startEditor() to intialize TinyMCE editor.
function startEditor(id) {
	tinymce.init({
		selector: "textarea#"+id,
		plugins: [
			"code ",
			"paste"
		],
		toolbar: "undo redo | bold italic | alignleft aligncenter alignright alignjustify | bullist numlist outdent indent | link code ",
		menubar:false,
		statusbar: false,
		content_style: ".mce-content-body {font-size:15px;font-family:Arial,sans-serif;}",
		height: 200
	});
}
We will call the function startEditor() and textrea id to load the editor.
$( document ).ready(function() {
	startEditor('message');
});
Step4: List Records with Message
In index.php file, we will list the posts with messages with edit button to edit the post message.
<div id="postLsit">
<?php
$result = $message->getPost();
while ($post = $result->fetch_assoc()) {
	$date = date_create($post['created']);
?>
	<article class="row" id="postRow_<?php echo $post['id']; ?>">
		<div class="col-md-2 col-sm-2 hidden-xs">
		  <figure class="thumbnail">
			<img class="img-responsive" src="images/user-avatar.png" />
			<figcaption class="text-center"><?php echo ucwords($post['user']); ?></figcaption>
		  </figure>
		</div>
		<div class="col-md-10 col-sm-10">
		  <div class="panel panel-default arrow left">
			<div class="panel-body">
			  <header class="text-left">
				<div class="comment-user"><i class="fa fa-user"></i> By: <?php echo $post['user']; ?></div>
				<time class="comment-date" datetime="16-12-2014 01:05"><i class="fa fa-clock-o"></i> <?php echo date_format($date, 'd M Y H:i:s'); ?></time>
			  </header>
			  <div class="comment-post"  id="post_message_<?php echo $post['id']; ?>">

				<?php echo $post['message']; ?>

			  </div>

			  <textarea name="message" id="<?php echo $post['id']; ?>" style="visibility: hidden;"></textarea><br>

			  <div class="text-right" id="button_section_<?php echo $post['id']; ?>">
				<a class="btn btn-default btn-sm" id="edit_<?php echo $post['id']; ?>"><i class="fa fa-reply"></i> Edit</a>
				<a class="btn btn-default btn-sm"><i class="fa fa-reply"></i> Delete</a>
			  </div>

			<div id="editSection_<?php echo $post['id']; ?>" class="hidden">
				<button type="submit" id="save_<?php echo $post['id']; ?>" name="save" class="btn btn-info saveButton">Save</button>
				<button type="submit" id="cancel_<?php echo $post['id']; ?>" name="cancel" class="btn btn-info saveButton">Cancel</button>
			</div>
			</div>

		  </div>
		</div>
	</article>
<?php }	?>
</div>
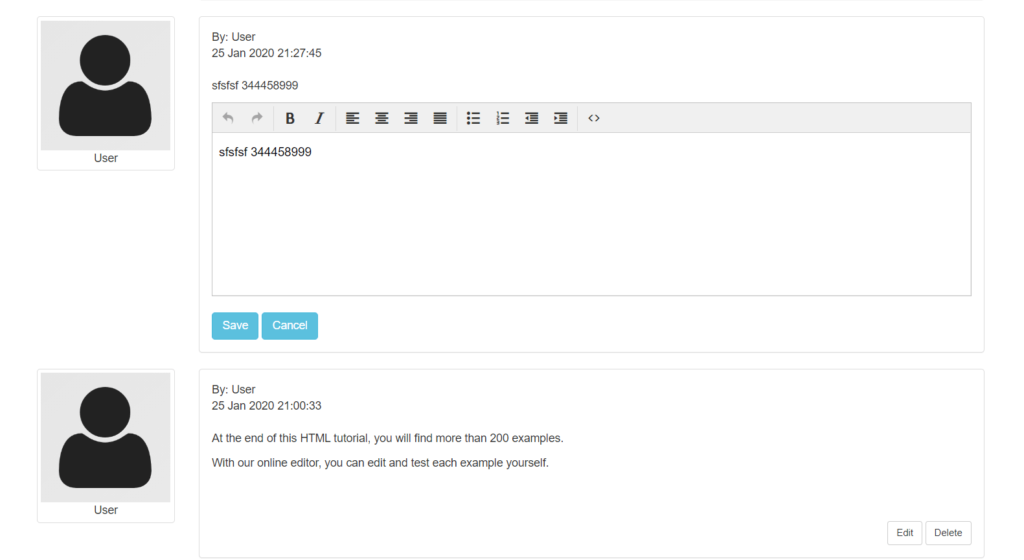
Step5: Load Dynamic TinyMCE Editor To Edit Message
In tinymce_editor.js file, we will load the TinyMCE by calling function startEditor(messageId) when click on post edit button to edit the message. We will load the TinyMCE editor with post message.
$('#postLsit').on('click','[id^=edit_]', function(event){
	var messageId = $(this).attr('id');
	messageId = messageId.replace(/edit_/g, '');
	messageId = parseInt(messageId);
	tinymce.execCommand("mceRemoveEditor", true, messageId);
	startEditor(messageId);
	tinymce.get(messageId).setContent($("#post_message_"+messageId).html());
	$("#editSection_"+messageId).removeClass('hidden');
	$("#button_section_"+messageId).addClass('hidden');
});
Step6: Edit Save Message
In tinymce_editor.js file, we will handle functionality to save post message from dynamic editor by making Ajax request to action.php with action update to edit save message. We will also handle to display the update message with details.
$('#postLsit').on('click','[id^=save_]', function(event){
	var messageId = $(this).attr('id');
	messageId = messageId.replace(/save_/g, '');
	messageId = parseInt(messageId);
	var postMessage = tinymce.get(messageId).getContent();
	tinymce.execCommand("mceRemoveEditor", true, messageId);
	var action = 'update';
	$.ajax({
		url:'action.php',
		method:"POST",
		data:{id:messageId, message:postMessage, action:action},
		dataType:"json",
		success:function(data){
			var html = $("#postHtml").html();
			html = html.replace(/USERNAME/g, data.user);
			html = html.replace(/POSTDATE/g, data.post_date);
			html = html.replace(/POSTMESSAGE/g, data.message);
			html = html.replace(/POSTID/g, data.id);
			$("#postRow_"+messageId).html(html);
			$("#editSection_"+messageId).addClass('hidden');
			$("#button_section_"+messageId).removeClass('hidden');
		}
	});
});
In action.php file, we will check for action update and call the update() method from class Message.php to update the record.
if(!empty($_POST['message']) && $_POST['message'] && $_POST['action'] == 'update') {
	$message->message = $_POST['message'];
	$message->id = $_POST['id'];
	$message->update();
}
In class Message.php, we will implement the update() method to update the message into database table and return updated record details.
public function update(){

	if($this->id && $this->message) {

		$stmt = $this->conn->prepare("
			UPDATE ".$this->messageTable." SET message = ?
			WHERE id = ?");

		$stmt->bind_param("si", $this->message, $this->id);

		if($stmt->execute()){
			$sqlQuery = "
				SELECT id, message, user, DATE_FORMAT(created,'%d %M %Y %H:%i:%s') AS post_date
				FROM ".$this->messageTable." WHERE id = '".$this->id."'";
			$stmt2 = $this->conn->prepare($sqlQuery);
			$stmt2->execute();
			$result = $stmt2->get_result();
			$record = $result->fetch_assoc();
			echo json_encode($record);
		}
	}
}
Step7: Remove Dynamic TinyMCE Editor
In tinymce_editor.js file, we will handle functionality to remove the loaded TinyMCE editor when click cancel button.
$('#postLsit').on('click','[id^=cancel_]', function(event){
	var messageId = $(this).attr('id');
	messageId = messageId.replace(/cancel_/g, '');
	tinymce.execCommand("mceRemoveEditor", true, messageId);
	$("#editSection_"+messageId).addClass('hidden');
	$("#button_section_"+messageId).removeClass('hidden');
});
You may also like:
- Follow and Unfollow System with PHP & MySQL
- GST Billing System with PHP & MySQL
- Restaurant Management System with PHP & MySQL
- Visitor Management System with PHP & MySQL
- Student Attendance System with PHP & MySQL
- Like and Dislike System with Ajax, PHP & MySQL
- Build Star Rating System with jQuery, PHP & MySQL
- User Registration and Login System with PHP & MySQL
- Build Contact Form with PHP and Ajax
- To-do List Application with Ajax, PHP & MySQL
- Build Event Calendar with jQuery , PHP & MySQL
You can view the live demo from the Demo link and can download the source from the Download link below.
Demo Download
can you provide database tables
Database table structure updated in post, you can get it from post. thanks!